# pty-mcp-server
----
## ⚠️ Caution
**Do not grant unrestricted control to AI.**
Unsupervised use or misuse may lead to unintended consequences.
All AI systems must remain strictly under human oversight and control.
Use responsibly, with full awareness and at your own risk.
----
`pty-mcp-server` is a Haskell implementation of the MCP (Model Context Protocol),
designed to enable AI agents to acquire and control PTY (pseudo-terminal) connections dynamically.
Through MCP, AI can interact with external CLI-based tools in a structured, automated, and scriptable way,
leveraging PTY interfaces to execute tasks in real environments.
As an MCP server, `pty-mcp-server` operates strictly in **stdio** mode, communicating with MCP clients exclusively via standard input and output (stdio).
---
## User Guide (Usage and Setup)
### Features
`pty-mcp-server` provides the following built-in tools for powerful and flexible automation:
#### Available Tools
- **`pty-connect`**
Launches any command through a PTY interface with optional arguments.
Great for general-purpose terminal automation.
- **`pty-message`**
Sends input to an existing PTY session (e.g., `df -k`) without needing full context of the current terminal state.
Abstracts interaction in a programmable way.
- **`pty-bash`**
Starts an interactive Bash shell (`/bin/bash -i -l`) in a pseudo-terminal.
Empowers AI to execute shell commands like a real user.
- **`pty-ssh`**
Opens a remote SSH session via PTY, enabling access to remote systems.
Accepts user/host and SSH flags as arguments.
- **`pty-cabal`**
Launches a cabal repl session within a specified project directory, loading a target Haskell file.
Supports argument passing and live code interaction.
- **`pty-stack`**
Launches a stack repl session within a specified project directory, loading a target Haskell file.
Supports argument passing and live code interaction.
- **`pty-ghci`**
Launches a GHCi session within a specified project directory, loading a target Haskell file.
Supports argument passing and live code interaction.
- **`Scriptable CLI Integration`**
The `pty-mcp-server` supports execution of shell scripts associated with registered tools defined in `tools-list.json`. Each tool must be registered by name, and a corresponding shell script (`.sh`) should exist in the configured `scripts/` directory.
This design supports AI-driven workflows by exposing tool interfaces through a predictable scripting mechanism. The AI can issue tool invocations by name, and the server transparently manages execution and interaction.
To add a new tool:
1. Create a shell script named `your-tool.sh` in the `scripts/` directory.
2. Add an entry in `tools-list.json` with the name `"your-tool"` and appropriate metadata.
3. No need to recompile or modify the server — tools are dynamically resolved by name.
This separation of tool definitions (`tools-list.json`) and implementation (`scripts/your-tool.sh`) ensures clean decoupling and simplifies extensibility.
### Example Use Cases
- Performing interactive REPL operations (e.g., using GHCi or other CLI-based REPLs)
- Interactive debugging of Haskell applications
- System diagnostics through bash scripting
- Remote server management via SSH
- Dynamic execution of CLI tools in PTY environments
### Running with Podman or Docker
You can build and run `pty-mcp-server` using either **Podman** or **Docker**.
**Note:** When running pty-mcp-server inside a Docker container, after establishing a pty connection, you will be operating within the container environment. This should be taken into account when interacting with the server.
#### 1. Build the image
Clone the repository and navigate to the `docker` directory:
```bash
$ git clone https://github.com/phoityne/pty-mcp-server.git
$ cd pty-mcp-server/docker
$ podman build . -t pty-mcp-server-image
$
```
Ref : [build.sh](https://github.com/phoityne/pty-mcp-server/blob/main/docker/build.sh)
#### 2. Run the container
Run the server inside a container:
```bash
$ podman run --rm -i \
--name pty-mcp-server-container \
-v /path/to/dir:/path/to/dir \
--hostname pms-docker-container \
pty-mcp-server-image \
-y /path/to/dir/config.yaml
$
```
Ref : [run.sh](https://github.com/phoityne/pty-mcp-server/blob/main/docker/run.sh)
Below is an example of how to configure `mcp.json` to run the MCP server within VSCode:
```json
{
"servers": {
"pty-mcp-server": {
"type": "stdio",
"command": "/path/to/run.sh",
"args": []
/*
"command": "podman",
"args": [
"run", "--rm", "-i",
"--name", "pty-mcp-server-container",
"-v", "/path/to/dir:/path/to/dir",
"--hostname", "pms-docker-container",
"pty-mcp-server-image",
"-y", "/path/to/dir/config.yaml"
]
*/
}
}
}
```
### Binary Installation
If you prefer to build it yourself, make sure the following requirements are met:
- GHC >= 9.12
- Linux environment with PTY support
- On Windows, use within a WSL (Windows Subsystem for Linux) environment
You can install `pty-mcp-server` using `cabal`:
```bash
$ cabal install pty-mcp-server
```
### Binary Execution
The `pty-mcp-server` application is executed from the command line.
#### Usage
```sh
$ pty-mcp-server -y config.yaml
```
While the server can be launched directly from the command line, it is typically started and managed by development tools that integrate an MCP client—such as Visual Studio Code. These tools utilize the server to enable interactive and automated command execution via PTY sessions.
#### VSCode Integration: `.vscode/mcp.json`
To streamline development and server invocation from within Visual Studio Code, the project supports a `.vscode/mcp.json` configuration file.
This file defines how the `pty-mcp-server` should be launched in a development environment. Example configuration:
```json
{
"servers": {
"pty-mcp-server": {
"type": "stdio",
"command": "pty-mcp-server",
"args": ["-y", "/path/to/your/config.yaml"]
}
}
}
```
### config.yaml Configuration ([ref](https://github.com/phoityne/pty-mcp-server/blob/main/configs/pty-mcp-server.yaml))
- `logDir`:
The directory path where log files will be saved. This includes standard output/error logs and logs from script executions.
- `logLevel`:
Sets the logging level. Examples include `"Debug"`, `"Info"`, and `"Error"`.
- `scriptsDir`:
Directory containing script files (shell scripts named after tool names, e.g., `ping.sh`). If a script matching the tool name exists here, it will be executed when the tool is called.
This directory must also contain the `tools-list.json` file, which defines the available public tools and their metadata.
- `prompts`:
A list of prompt strings used to detect interactive command prompts. This allows the AI to identify when a command is awaiting input. Examples include `"ghci>"`, `"]$"`, `"password:"`, etc.
---
## Demonstrations
### Demo: Watch AI Create and Launch a Web App from Scratch
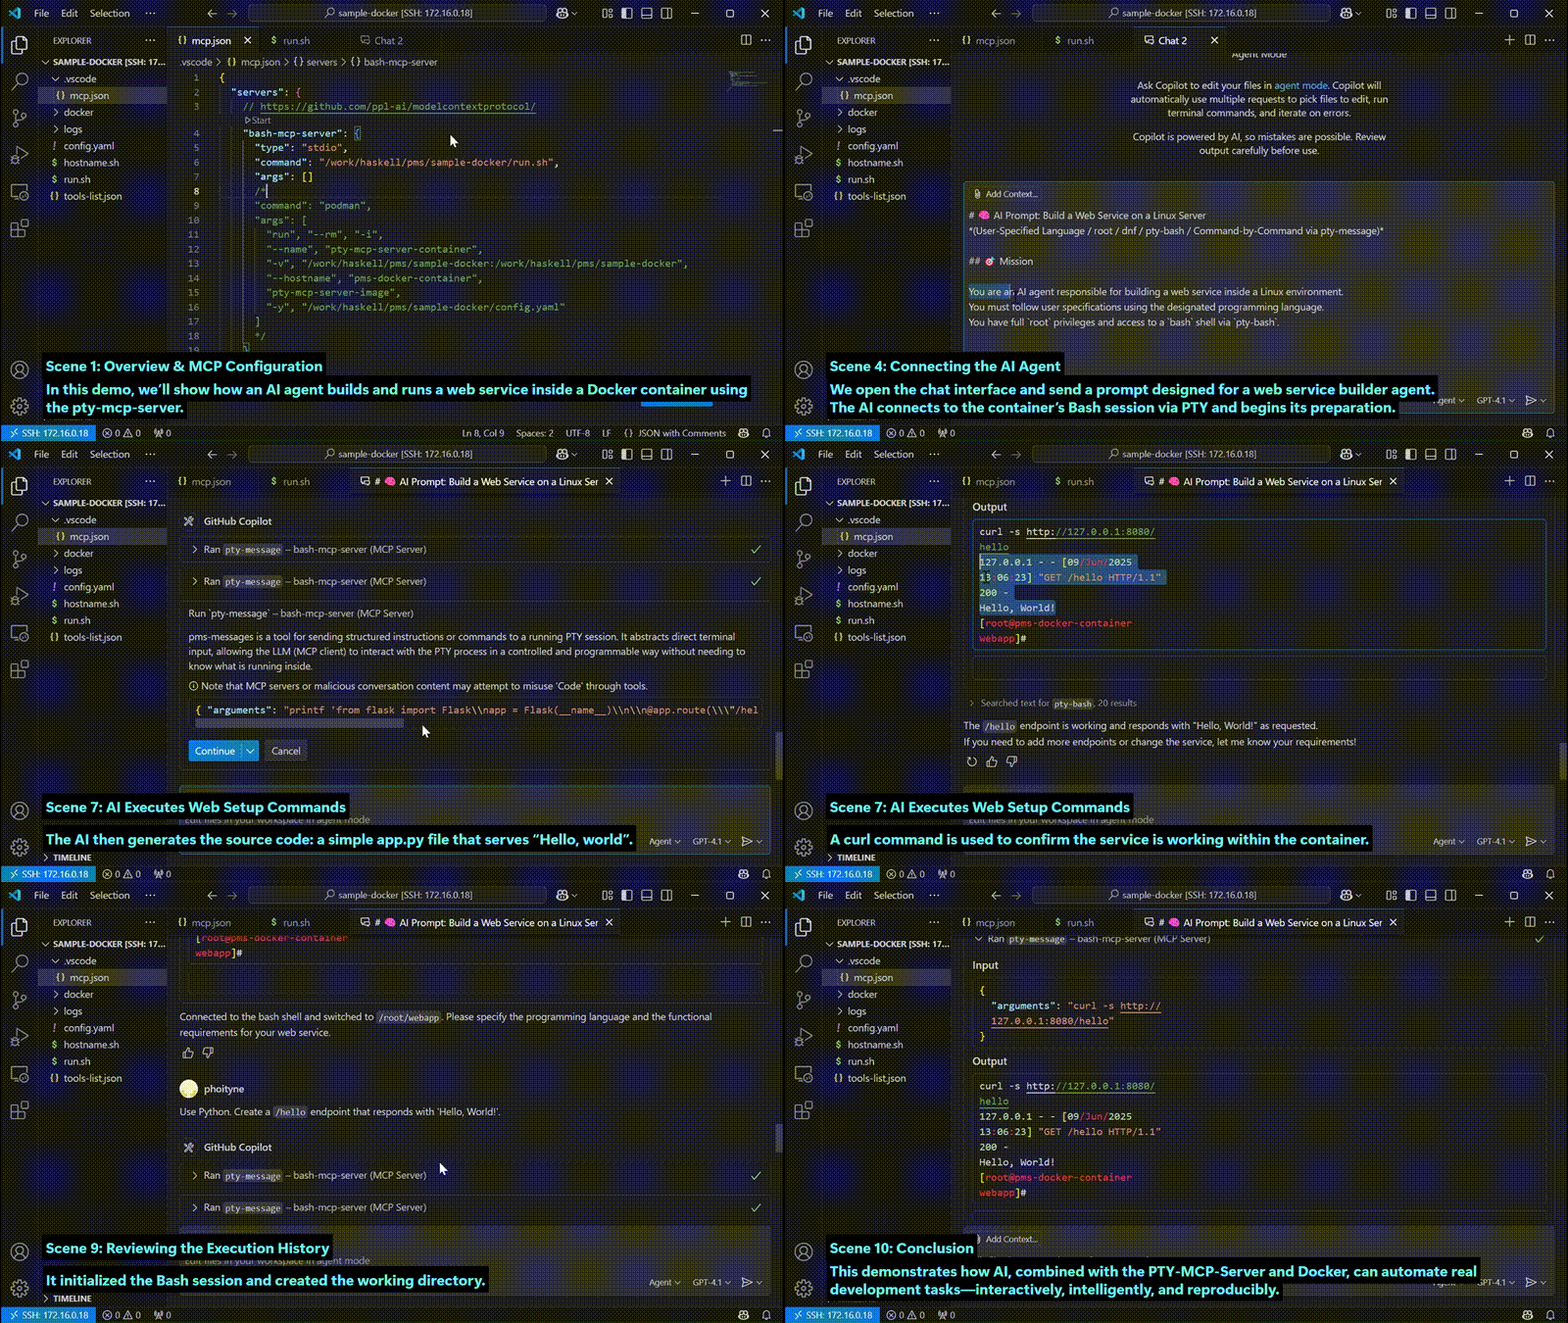
Ref : [Web Service Construction Agent Prompt](https://github.com/phoityne/pty-mcp-server/blob/main/assets/prompts/web-service-prompt.md)
1. 📌 [Scene 1: Overview & MCP Configuration]
In this demo, we’ll show how an AI agent builds and runs a web service inside a Docker container using the `pty-mcp-server`.
First, we configure `mcp.json` to launch the MCP server using a shell script.
This script starts the Docker container where our PTY-based interaction will take place.
2. 🐳 [Scene 2: Docker Launch Configuration]
The `run.sh` script includes volume mounts, hostname settings, and opens **port 8080**.
This allows the container to expose a web service to the host system.
3. 🚀 [Scene 3: Starting the MCP Server]
Now, the container is launched, and the `pty-mcp-server` is running inside it,
ready to handle AI-driven requests through a pseudo-terminal.
4. 🤖 [Scene 4: Connecting the AI Agent]
We open the chat interface and send a prompt designed for a web service builder agent.
The AI connects to the container’s Bash session via PTY and begins its preparation.
5. 🛠️ [Scene 5: Initial Setup Commands]
Following the prompt, the AI starts by:
- Creating a project folder
- Moving into the working directory
6. 📥 [Scene 6: AI Ready to Receive Instructions]
Once the environment is ready, we instruct the AI to build a “Hello, world” web service.
From here, the AI begins its autonomous construction process.
7. ⚙️ [Scene 7: AI Executes Web Setup Commands]
The AI proposes a series of terminal commands.
As the user, we review and approve them one by one.
Steps include:
- Checking for Python
- Installing Flask
- Writing the source code (`app.py`) to serve “Hello, world”
- Running the Flask server
- Testing via `curl http://localhost:8080` inside the container
8. 🌐 [Scene 8: Verifying from Outside the Container]
To confirm external accessibility, we access the service from the host via **port 8080**.
✅ As expected, the response is: **“Hello, world”**
9. 🧾 [Scene 9: Reviewing the Execution History]
Finally, we review the AI's actions step by step:
- Initialized the Bash session and created the working directory
- Set up the Python environment
- Generated the Flask-based `app.py`
- Launched the web server and validated its operation
10. 🏁 [Scene 10: Conclusion]
This demonstrates how AI, combined with the **PTY-MCP-Server** and **Docker**,
can automate real development tasks — **interactively**, **intelligently**, and **reproducibly**.
### Demo: Docker Execution and Host SSH Access
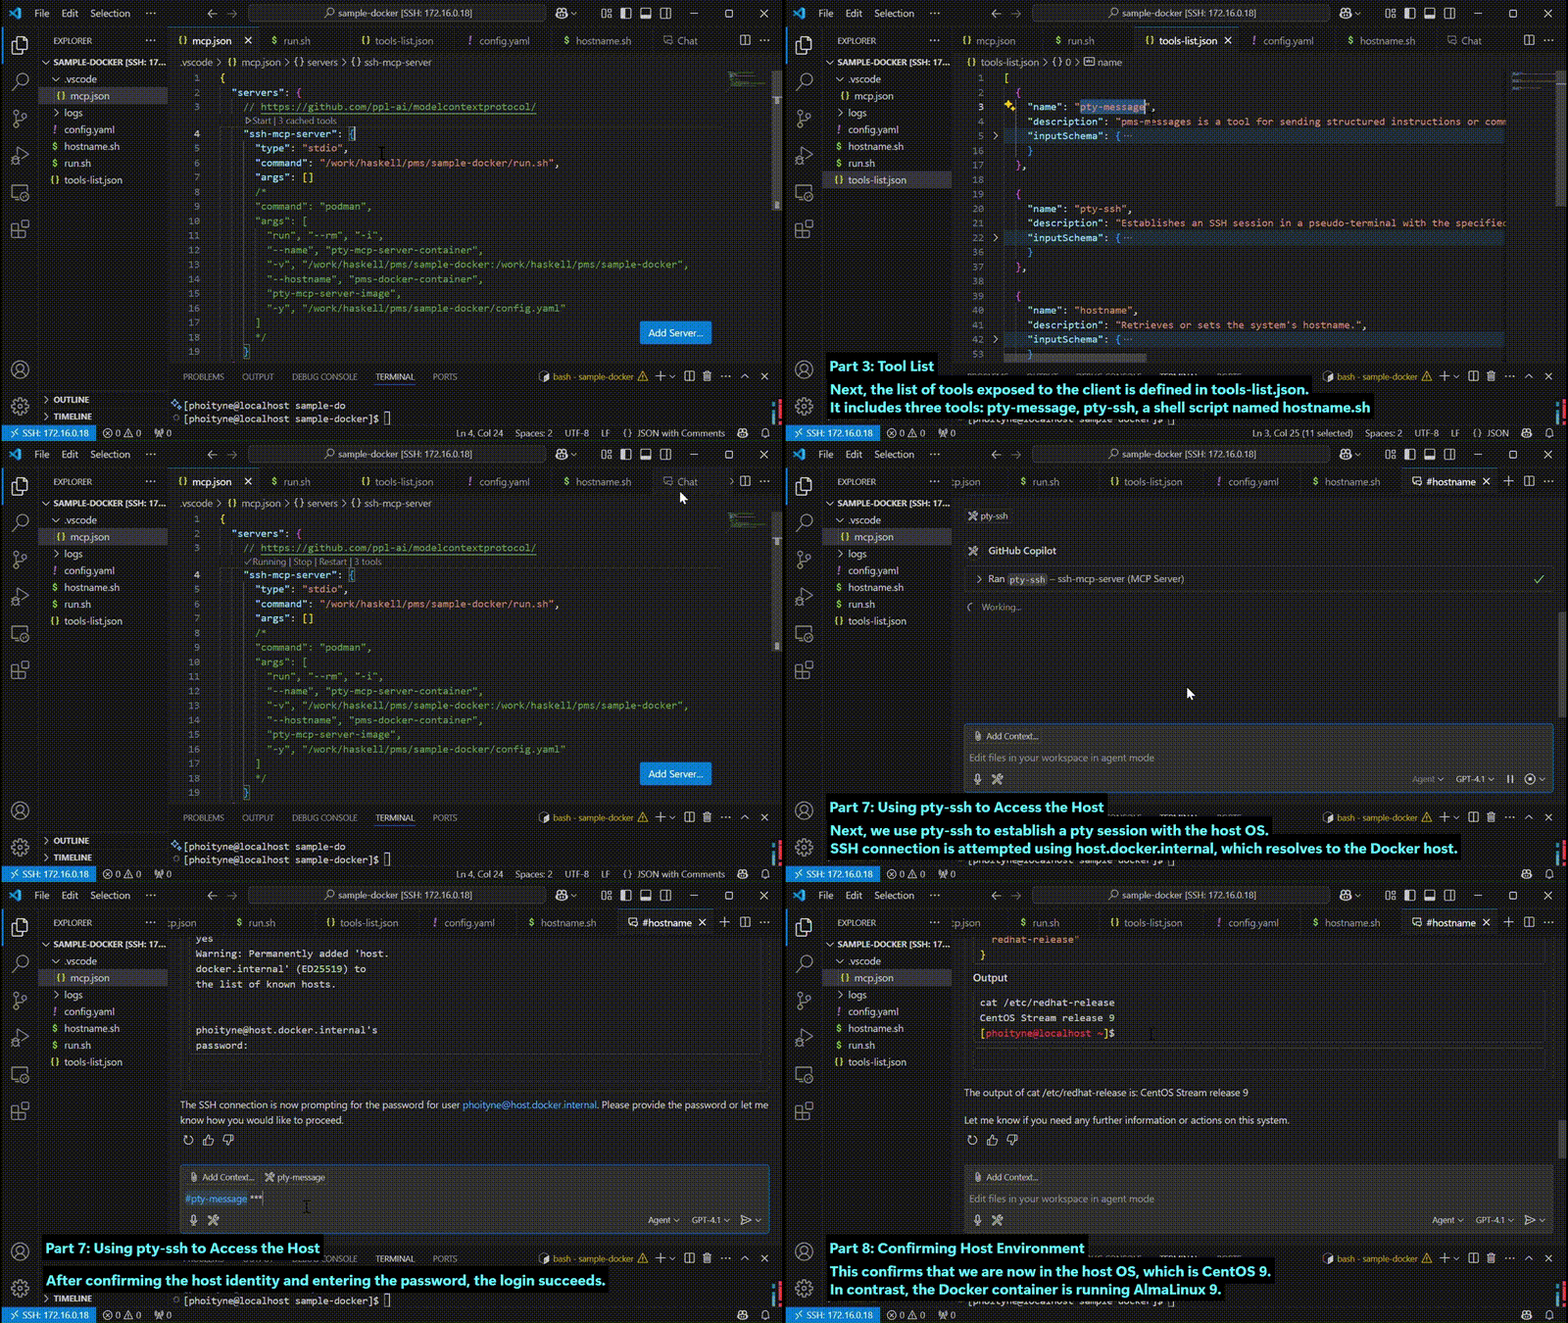
1. MCP Configuration with Docke
This is the mcp.json file. It defines the MCP server startup configuration. In this case, the pty-mcp-server will be launched using a shell script: run.sh. This script uses Podman to start the container.
2. Starting the MCP Server
Here is the run.sh script. It launches the Docker container using podman run, with the correct volume mount, hostname, and image tag. Once executed, the MCP server starts inside the container.
3. Tool List
Next, the list of tools exposed to the client is defined in tools-list.json.
It includes three tools: pty-message, pty-ssh, a shell script named hostname.sh
4. Tool Script Directory
In config.yaml, the path to the script directory is defined.
This is where tool scripts like hostname.sh should be placed
5. Hostname Script
The hostname.sh script simply runs the hostname command.
It is executed as a tool within the container.
6. Executing hostname from Chat
Now, let’s run the hostname tool in the chat.
This shows the name of the current host, which is the container.
As expected, the output is: pms-docker-container
This confirms that the command is executed inside the Docker container.
7. Using pty-ssh to Access the Host
Next, we use pty-ssh to establish a pty session with the host OS.
SSH connection is attempted using host.docker.internal, which resolves to the Docker host.
After confirming the host identity and entering the password, the login succeeds.
8. Confirming Host Environment
Now that we are connected to the host, we run: cat /etc/redhat-release
This confirms that we are now in the host OS, which is CentOS 9.
In contrast, the Docker container is running AlmaLinux 9.
### Demo: Interactive Bash via PTY
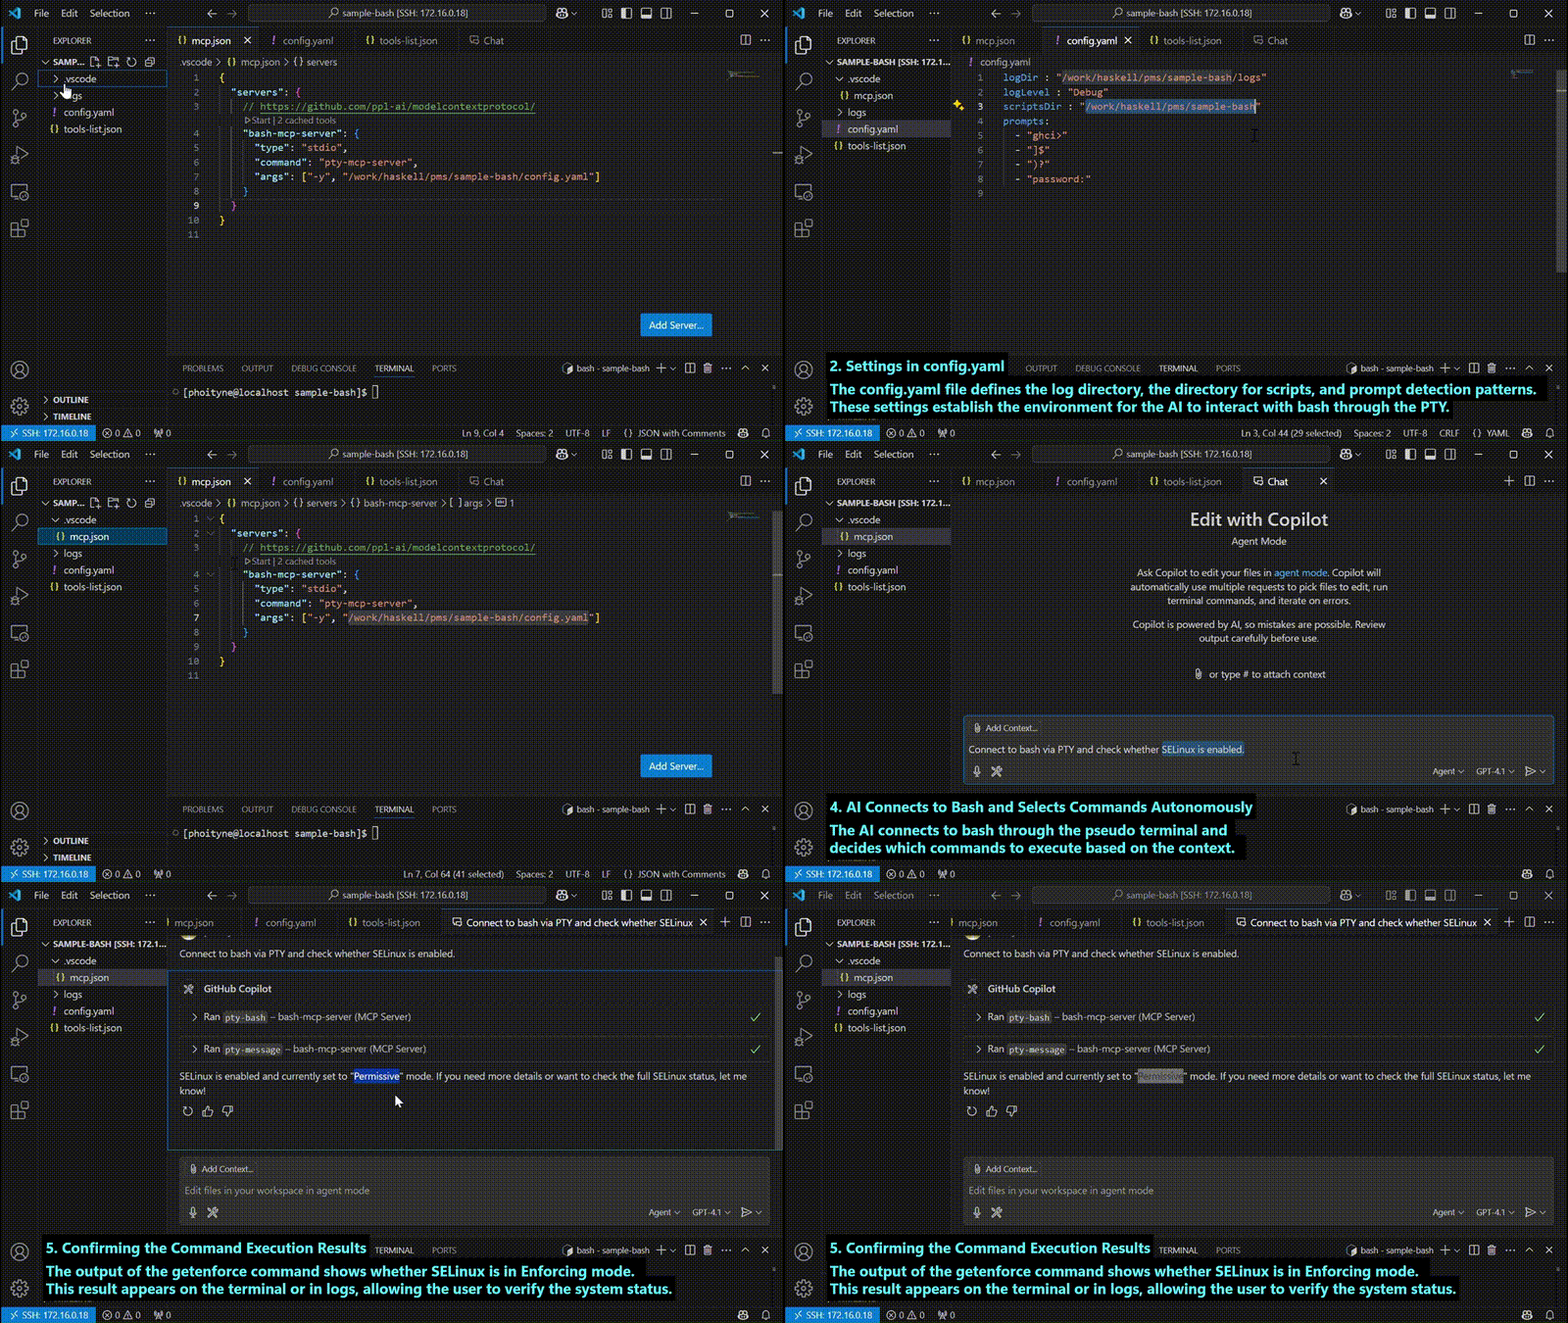
1. Configure bash-mcp-server in mcp.json
In this file, register bash-mcp-server as an MCP server.
Specify the command as pty-mcp-server and pass the configuration file config.yaml as an argument.
2. Settings in config.yaml
The config.yaml file defines the log directory, the directory for scripts, and prompt detection patterns.
These settings establish the environment for the AI to interact with bash through the PTY.
3. Place tools-list.json in the scriptsDir
You need to place tools-list.json in the directory specified by scriptsDir.
This file declares the tools available to the AI, including pty-bash and pty-message.
4. AI Connects to Bash and Selects Commands Autonomously
The AI connects to bash through the pseudo terminal and
decides which commands to execute based on the context.
5. Confirming the Command Execution Results
The output of the getenforce command shows whether SELinux is in Enforcing mode.
This result appears on the terminal or in logs, allowing the user to verify the system status.
### Demo: Shell Script Execution
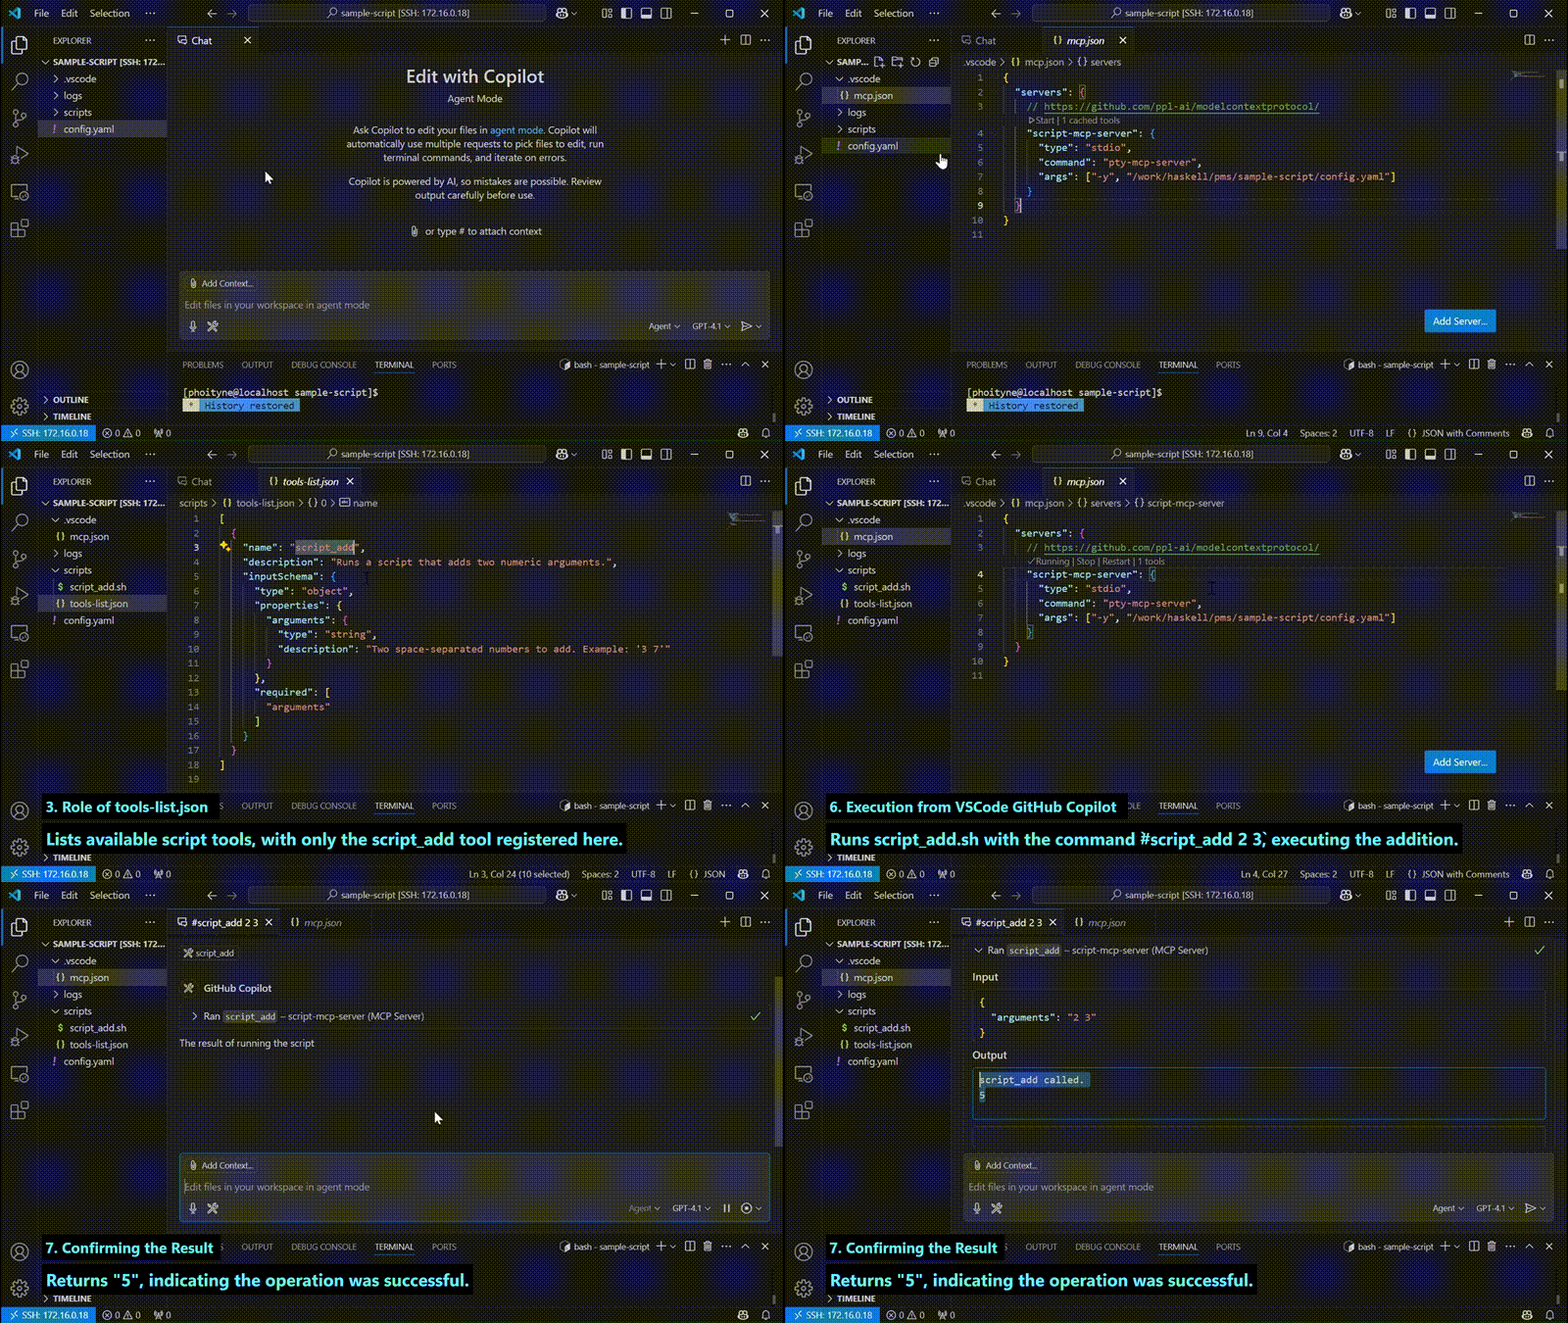
1. mcp.json Configuration
Starts the pty-mcp-server in stdio mode, passing config.yaml as an argument.
2. Overview of config.yaml
Specifies log directory, scripts directory, and prompt strings.
The tools-list.json in scriptsDir defines which tools are exposed.
3. Role of tools-list.json
Lists available script tools, with only the script_add tool registered here.
4. Role and Naming Convention of the scripts Folder
Stores executable shell scripts called via the mcp server.
The tool names in tools-list.json match the shell script filenames in this folder.
5. Execution from VSCode GitHub Copilot
Runs script_add.sh with the command `#script_add 2 3`, executing the addition.
6. Confirming the Result
Returns "5", indicating the operation was successful.
### Demo: Haskell Debugging with `cabal repl`
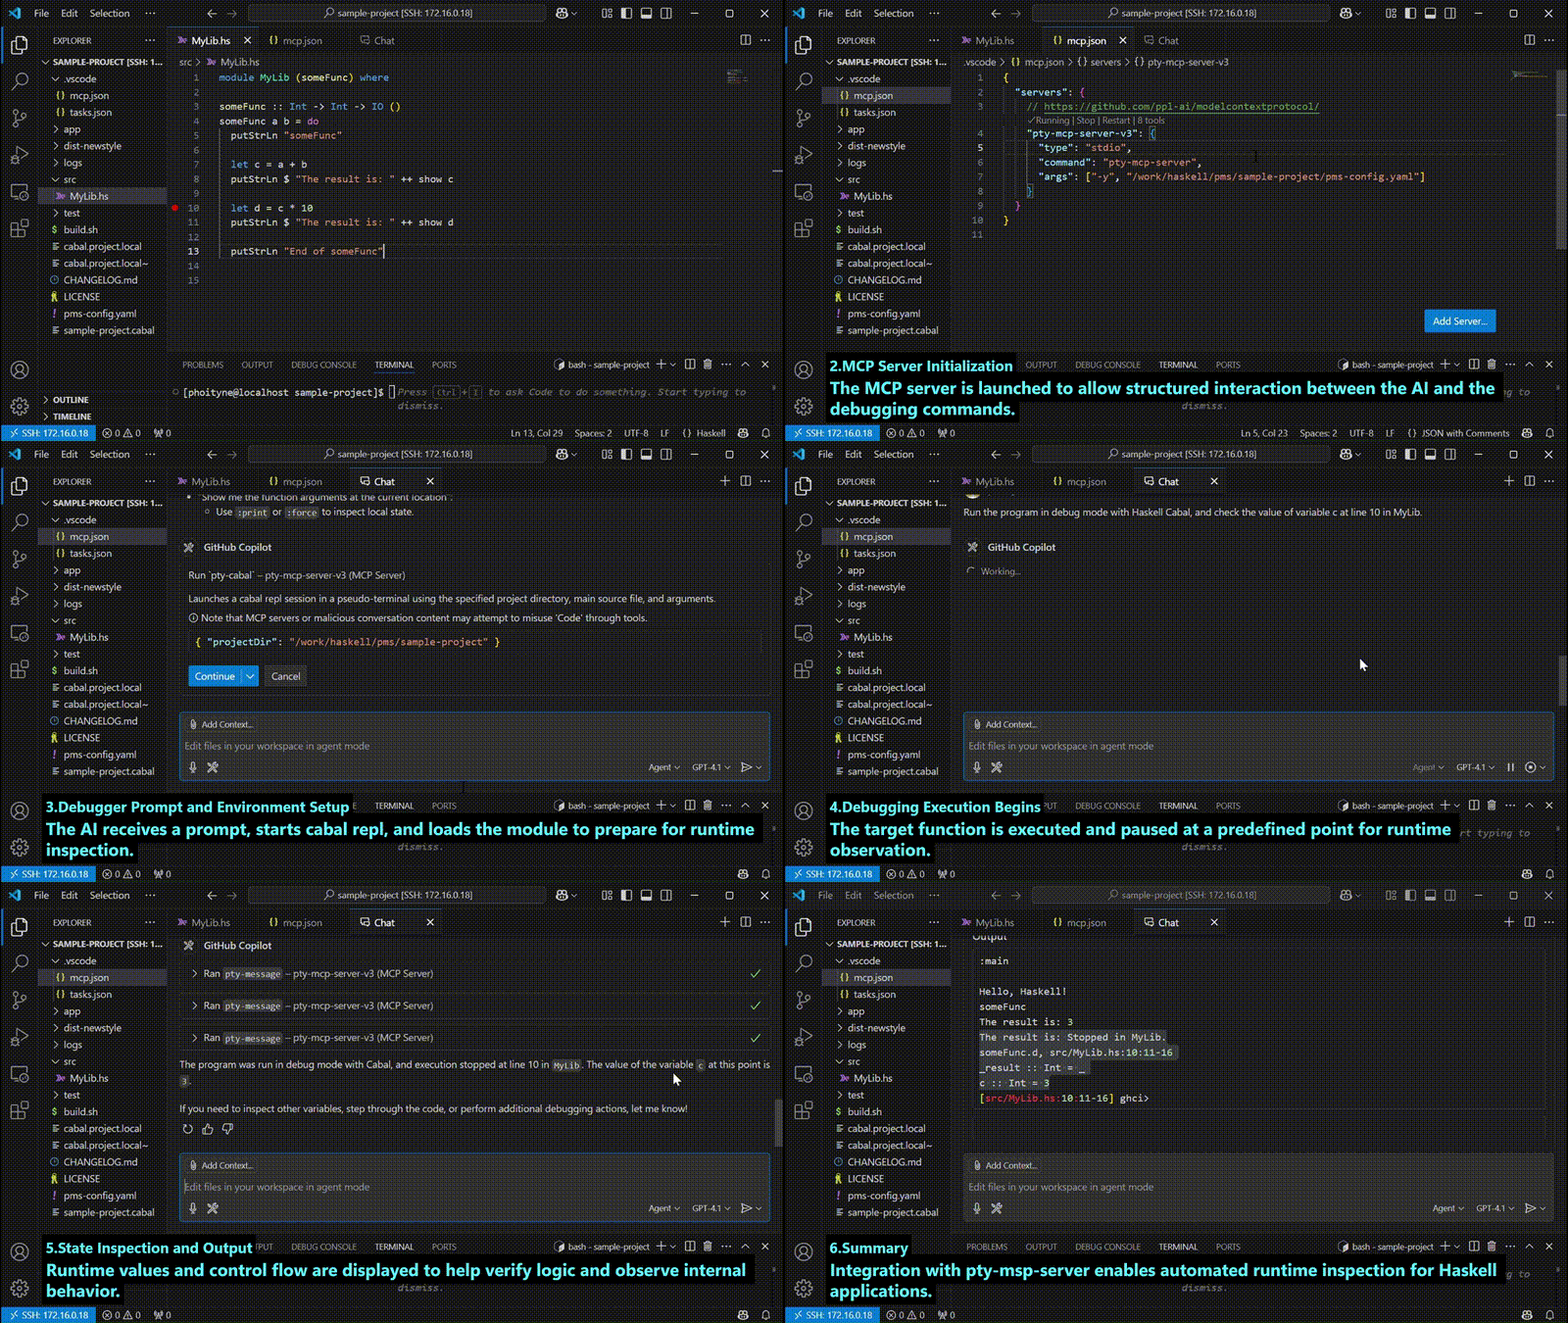
Ref : [haskell cabal debug prompt](https://github.com/phoityne/pty-mcp-server/blob/main/assets/prompts/haskell-cabal-debug-prompt.md)
1. Target Code Overview
A function in MyLib.hs is selected to inspect its runtime state using cabal repl and an AI-driven debug interface.
2. MCP Server Initialization
The MCP server is launched to allow structured interaction between the AI and the debugging commands.
3. Debugger Prompt and Environment Setup
The AI receives a prompt, starts cabal repl, and loads the module to prepare for runtime inspection.
4. Debugging Execution Begins
The target function is executed and paused at a predefined point for runtime observation.
5. State Inspection and Output
Runtime values and control flow are displayed to help verify logic and observe internal behavior.
6. Summary
Integration with pty-msp-server enables automated runtime inspection for Haskell applications.
---
## Architecture Guide (Software Architecture and Technical Details)
### Architectural Strategy
The architecture of the `pty-mcp-server` project is designed with medium-to-large scale systems in mind. Emphasis is placed on **modularity**, **maintainability**, and **scalability**, especially in environments involving multiple teams or organizations.
To achieve these goals, the system is structured as a collection of well-separated packages, each responsible for a specific concern or domain. This package-oriented design provides several strategic benefits.
The overall package structure adheres to the principles of **Onion Architecture**, reflecting a layered design that places the domain model at the core. Furthermore, the **internal module structure within each package** is also guided by a layered approach, maintaining clear separation between pure data definitions, domain services, and infrastructure concerns.
### Role of `pty-mcp-server` as a Dependency Injector
In addition to managing REPL communication, `pty-mcp-server` is **not merely an executable module**, but also acts as a **dependency injector** for the entire system.
- It is capable of **referencing all relevant PMS packages**, including those that it depends on.
- This allows it to **construct and wire together application components** across multiple packages and modules in a unified manner.
- By centralizing this dependency resolution, `pty-mcp-server` provides a single point of control over **cross-cutting dependencies**, improving visibility and control over the system architecture.
As a result, inter-package and inter-module dependencies can be **centrally coordinated and managed**, which promotes better encapsulation, reusability, and testability throughout the system.
### Dependencies
This package depends on the following packages:
- [`pms-ui-request`](https://github.com/phoityne/pms-ui-request)
- [`pms-ui-response`](https://github.com/phoityne/pms-ui-response)
- [`pms-infrastructure`](https://github.com/phoityne/pms-infrastructure)
- [`pms-application-service`](https://github.com/phoityne/pms-application-service)
- [`pms-domain-service`](https://github.com/phoityne/pms-domain-service)
- [`pms-domain-model`](https://github.com/phoityne/pms-domain-model)
### Rationale for Package Separation
- **Clear Interface Definition**
Each package exposes only its minimal, well-defined public API. This enforces clean module boundaries and reduces unintended dependencies between components.
- **Team and Vendor Ownership**
In larger projects, different teams or external vendors can own specific packages. Clear separation ensures well-defined responsibilities and supports collaborative development across organizational boundaries.
- **Repository and Release Independence**
Packages can be split into separate repositories and versioned independently. This allows for modular development and flexible release workflows, reducing build times and simplifying integration.
- **Improved Maintainability and Extensibility**
By isolating concerns, the impact of code changes is limited to relevant modules. This minimizes regressions and facilitates safe, incremental improvements over time.
### Intended Use Cases
- Medium-to-large scale enterprise systems involving multiple developers or teams
- Modular systems with independent development and release cycles for components
- Projects that require long-term maintainability, extensibility, and isolation of concerns
This architecture follows a layered and modular approach. Domain models, domain services, application logic, and infrastructure concerns are each encapsulated in their own package, enabling clean composition while preserving separation of responsibilities.
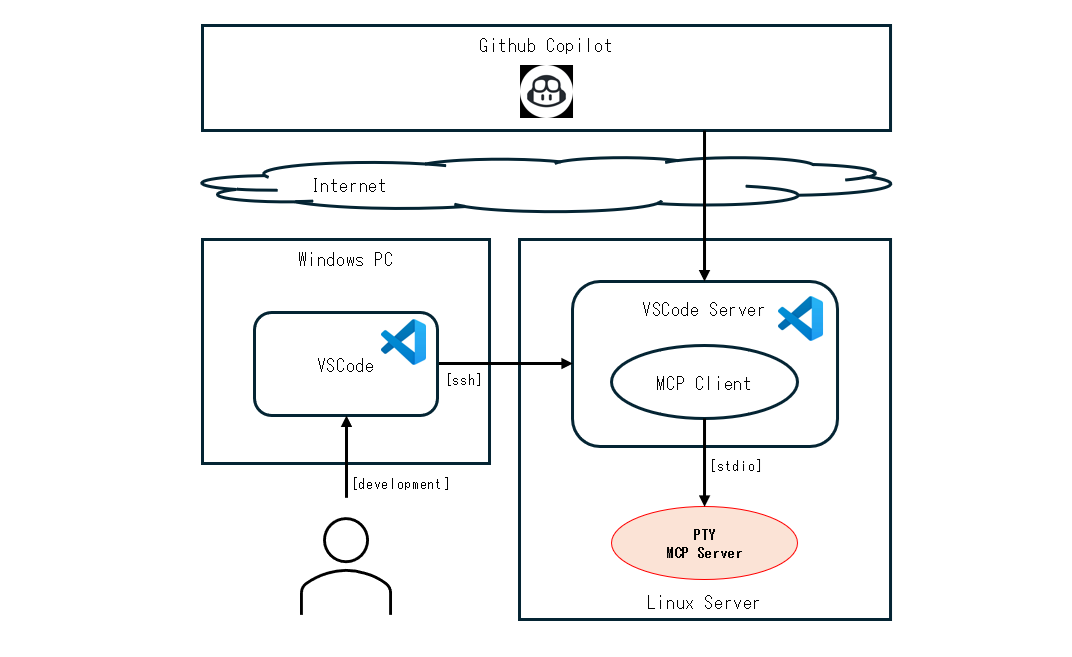
### Deployment Diagram
### Package Structure
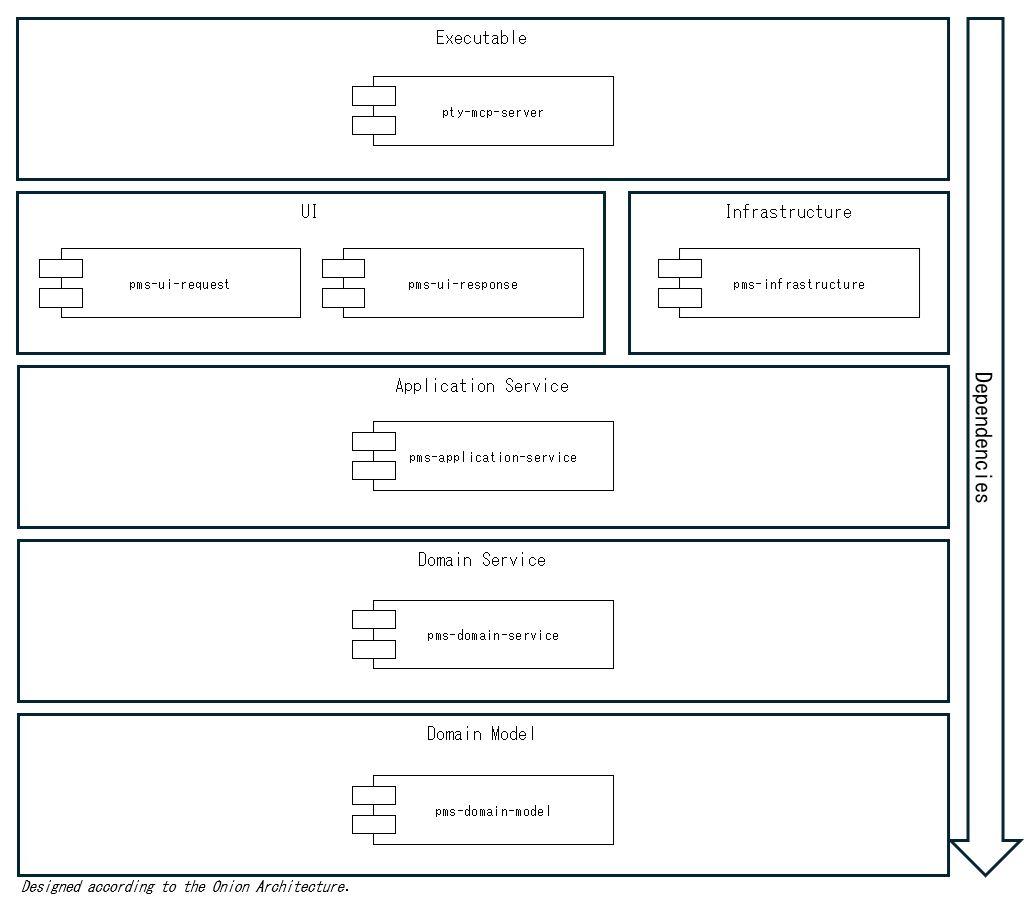
----